Buildbot Documentation
Buildbot use is deprecated, however at this time it is still required for software release and distribution. If you are a package maintainer and need buildbot access, open a ticket assigned to the SQuaRE team.
Below is the legacy buildbot documentation; it is not actively maintained.
Triggering a Buildbot build
Buildbot is a confederation of: a Buildmaster which schedules builds according to periodic-, user initiated- and SCM- triggers; Builders which carry out a static sequence of commands called Build Steps; and Buildslaves which provide compute resources on remote hosts. DM Buildbot’s continuous integration service uses the Builder: DM_stack, hosted on the the system: lsst-dev.ncsa.illinois.edu.
Buildbot’s web presence is installed at http://lsst-buildx.ncsa.illinois.edu:8010/waterfall; this view displays every Builder. To tailor the Waterfall view to your preferences, visit the help page at http://lsst-buildx.ncsa.illinois.edu:8010/waterfall/help . For a more compact display, use: http://lsst-buildx.ncsa.illinois.edu:8010/one_line_per_build .
The LSST hipchat room: “Bot: Buildbot notification” at hipchat://hipchat.com/room/856354 provides the completion status of every build. The status summary includes a hot-link to the build’s log, the build’s success or failure, the initiating user and the branches used to acquire the required git repositories. User: ‘everyman’ is listed when automatically scheduled builds are summarized.
Web Views
Banner on all Views
The first line provides links to all Buildbot views. They are:
- The Waterfall view will give you a time-oriented summary of recent buildbot activity. See also: Waterfall Help.
- The Grid view will give you a developer-oriented summary of recent buildbot activity.
- The Transposed Grid view presents the same information as the grid, but lists the revisions down the side.
- The Console presents a user-oriented status page.
- The Builders and their most recent builds are here.
- Recent Builds (also identified as One-Build_Per_Line) are summarized here, one per line. Provides rapid access to builder or build status.
- Buildslave information
- Changesource information.
- About this Buildbot
Color Use
Buildbot views convey immediate status information via the color of a display element:
- yellow - in progress
- green - success
- orange - WARNING on completion
- red - FAILURE on completion
- purple - internal Buildbot failure. May be caused by Buildbot Guru forcing a build step to terminate
- gray - depends on where the gray field occurs.
Depending on what the display element is referencing, the color could indicate a step returned FAILURE or the build has been declared a FAILURE. Depending on the specification of the Builder, a build could be declared a FAILURE if any build step returned FAILURE, or if any build step returned FAILURE or WARNING, or if specific build steps return FAILURE or WARNING, etc. The build step return can affect whether the next build step in the predefined sequence is invoked (this is the closest to real-time step specification as exists). This attribute has been used to continue processing build steps even though an earlier step failed - sometimes that is appropriate, and sometimes, it is not.
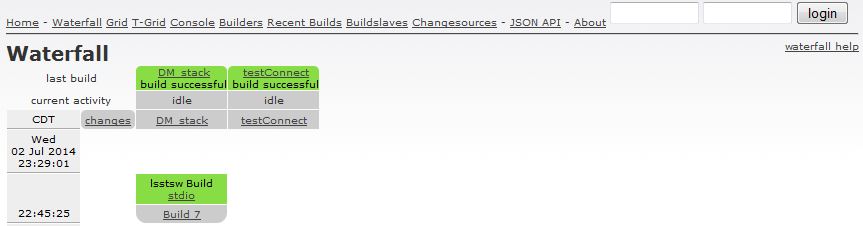
Waterfall View
The waterfall view is a time-oriented display of multiple Builders’ progress (aka: the columns) through each Builder’s specific build steps.
Waterfall Banner
- The top row, right, contains the login banner. Authentication is only needed if the user wants to force a build.
- The top row, left, contains links to the different web views supported as discussed in the section: “Banner on all Views”.
- The second row, right, links to a customization help message for the waterfall view.
- The first color row uses its color to highlight the status of the last Builder instantiation: green = success, red = failure; it also contains a link to the Builder’s summary status page containing its Force build form.
- The middle color row uses color to indicate the status of the current Builder instantiation: idle = light gray, running = yellow, offline = dark gray.
- The bottom gray row provides a link to the Builder’s summary status page which also contains its Force build form.
Waterfall Column Content
- Due to the time-of-day layout with current time at the head of the column, the steps of a build sequence are displayed in reverse order. The first column is the time-of-day. The second column is unused; DM does not use Buildbot’s method of triggering on git-changes. All following columns are records of the build sequence progress for the selected view’s Builders.
- The start of a build sequence begins with a thin gray item with its unique build number linking to detailed status on each build step. The build log for each step is represented by the link entitled stdio. The build step colors represent either the current progress or final status of the step.
- Note since this document was originally prepared, there have been enhancements to the waterfall display to include the branches used during the build. These are not represented in the screen shots in this document. You will see the branches used between the hotlinks for ‘build #” and ‘stdio’.
Specific Builder View
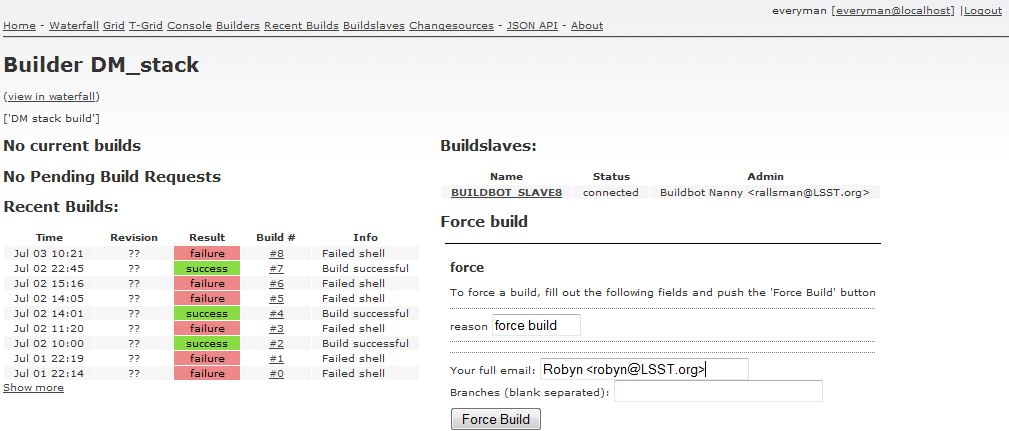
The view of a specific Builder provides status on past, present and future build requests and user input fields allowing the user to:
- Force Build - Initiate a build using the information supplied by the user in fields: “Your full email:” and, optionally, “Branches (blank separated)” followed by the ‘Force Build’ button. The ‘everyman’ account may use this entry.
- Rebuild - Reruns the last build using the identical setup including the same user input. The everyman account may use this entry.
- Stop This Build - Terminates the currently running build. This is restricted to Buildbot admins.
- Cancel Pending Build - remove a prospective build from the queue. This is restricted to Buildbot admins.
Builder Descriptions
DM support two Builders, currently: DM_stack and testConnect
- The DM_stack build step performs 3 actions: (1) build the DM stack using the specified branches from the DM source repository; (2) Generate the master doxygen documentation; and (3) run one or more end-to-end integration tests. The log file contains the output from each of those phases interleaved with buildbot’s orchestration messages. Buildbot evaluates the processing status as each phase completes to determine whether and how to proceed to the next phase of processing.
- The testConnect build step is a placeholder. It currently tests connectivity to a VM.
Step-by-step guide to Triggering a Buildbot Build
1. Access the Buildbot Web interface
Browse to: http://lsst-buildx.ncsa.illinois.edu:8010/waterfall . At this point, without being logged in, you may view the current and historic build status for the Builders provided. The Builders are the columns indicating a state: idle, building, offline.
Experiment with the other view options provided on the banner line; mostly you’ll use either the One-Line-Per-Build view or the Waterfall view, the user input page for the DM_stack builder, and the status page for a specific Build which is identified by its Build number.
The Waterfall view does not auto-refresh. To add a 60 second refresh, append: ”?reload=60” to its web address. E.g. http://lsst-buildx.ncsa.illinois.edu:8010/waterfall?reload=60 . Note that the view of the Build log (identified as stdio) does auto-refresh without intervention.
2. Setup A Build
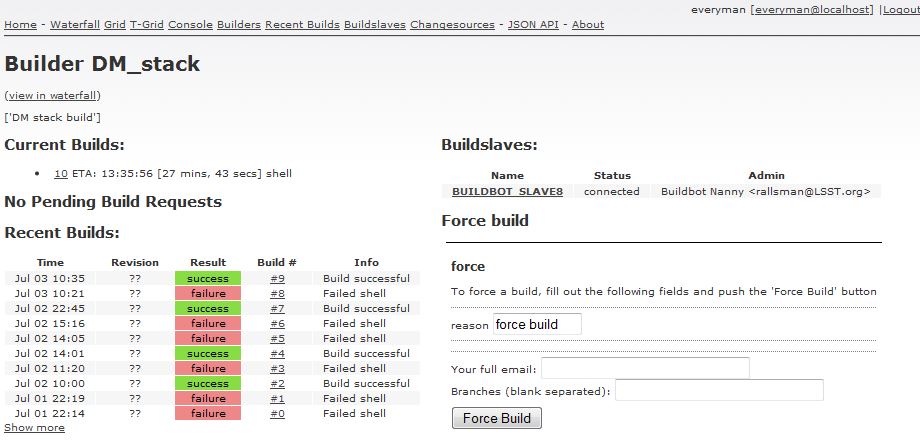
Select the DM_stack hot link to transfer to the builder status page where you enter your build request. This page also links to the current and past builds for this Builder.
LSST DM Developer Guide > Triggering a Buildbot Build > .. image:: /_static/buildbot/To_Force.jpg
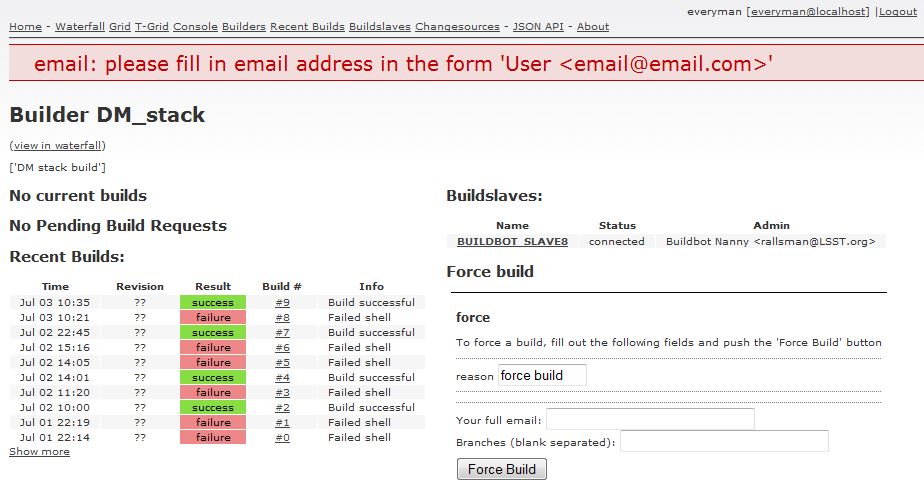
A. Enter your Email Address
Buildbot will send you direct email regarding your build’s completion status. This field is required and must be formatted: “name <user@email.com>”.
If you resisted using the required email field format, the following is displayed.
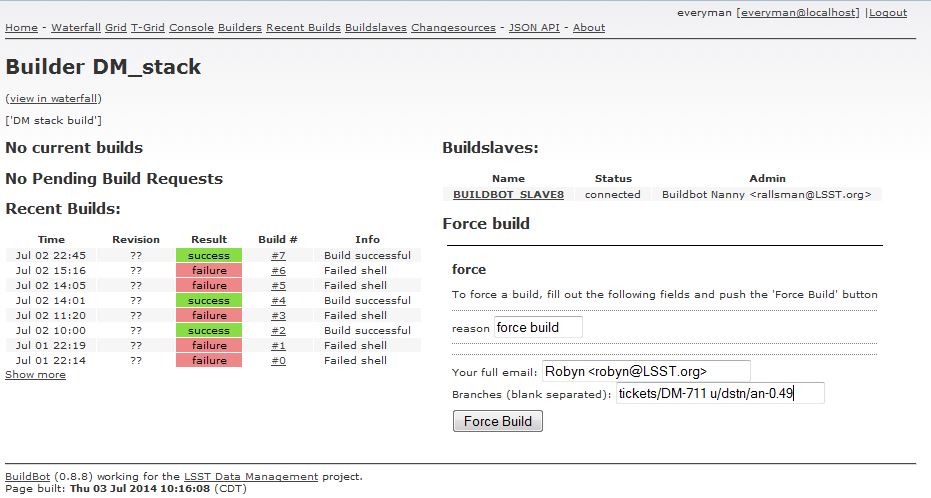
B. Enter Optional Git-Branch Use
You may also provide an ordered list of branches to be preferentially used during git-package extraction. The list does not need to include the ‘master’ branch since that is automatically appended to the end of the list as the branch of last resort. The default is to only use the ‘master’ branch. The list is blank separated.
In the example below, notice that 2 branches are provided. This build and integration run will determine if the provided branches are ready for merging into the master stack based on clean compilation, build, and unit and end-to-end testing.
3. Trigger the Build
Select the “Force Build” button to trigger your build. If the Builder is not in the midst of another build, then your job is started and the view updates to show your job as current (see below). If there is a build in-progress, your build will be entered into the Pending Build Requests list; it will be processed in first-in, first out order.
4. Viewing a Build’s Status
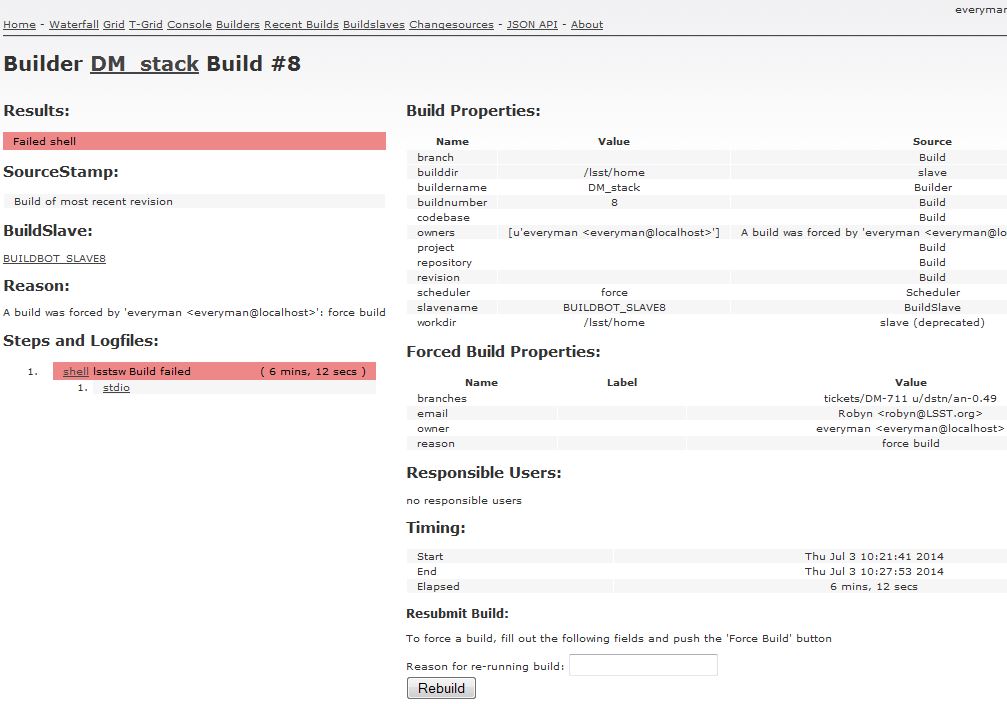
If you select a Build Number hot-link, you will see a very detailed status report on that particular build. In the sample below, notice the “Steps and Logfiles” with a hotlink to stdio – the log of this build’s run. Notice the “Forced Build Properties” section which shows the use of multiple branches being test-integrated into the stack. And finally, notice the Rebuild button to force an identically setup run.
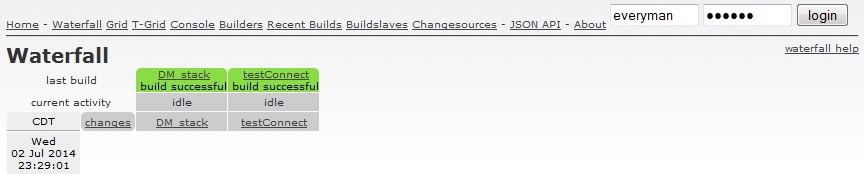
5. Viewing the DM_stack’s Log
Alternate access to the full build’s stdio log is also available from the Waterfall view - as shown below.
6 Login and Cancelling a Pending or In-progress Build
A. Login to Buildbot User Interface
Buildbot requires authentication only when the user wants to terminate a pending or in-progress run. Authentication uses the htpasswd protocol. Developers are requested to enter the username and encrypted htpasswd into lsst-dev:~lsstsw/BUILDBOT_POWERS_HERE; The SQuaRE Team will load your data into the appropriate location; to ensure it’s done in a timely manner, mention it in the SQuaRE chatroom.
Once your account is setup, enter your username and password into the fields at the upper right hand corner and select ‘Login’. The system automatically logs you out once a day.
You are now logged in and ready to let Buildbot know which Build you want terminated.
B. Cancel a Pending or In-progess Build
In the Waterfall display, select the builder stack for which you want to cancel the build, for example: select the grayed ‘DM_stack’ hotlink. This takes you to the list of jobs building, pending and completed. Select the hotlink for the build you want terminated. This takes you to the display of that build where you will find the ‘Stop This Build’ button. Enter your reason for stopping the build and then select that button.
Using the System Stack while Debugging
Determine the Build Number
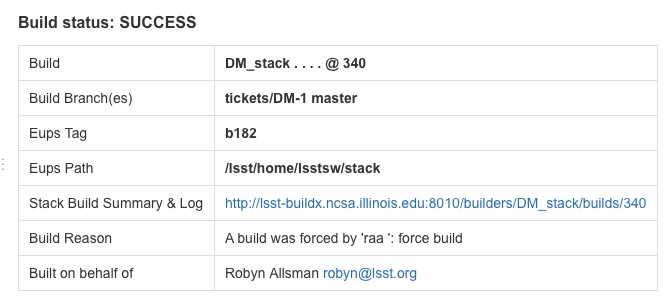
You can recreate the DM stack environment created by a specific build as long as you can identify the Buildbot build number. If you triggered the build using the ForceBuild form, you will receive an email with the build number identified in the text. Look for ‘@ NNN:’ in the first line of the emailed table; in the example below, that would be “@ 340”.
Determine the Eups-Tag
You have three options for determining the eups-tag:
- If you have access to the lsst-dev system, you can use the lookup
table: lsst-dev:~lsstsw/build/eupsTag_buildbotNum to find the
eups-tag corresponding to the buildbot build number assigned.
- The format is: <eupsTag>:<build#>:<completion status>:<blank separated list of branches>.
- Note that the <build#> changes with each new build but the
- <eupsTag> is repeated until a new source change triggers a new eups-tag.
- If you have the email sent on completion of a build, you can easily find the Eups-tag in the lead table of that email. See example above for “Eups Tag b182”.
- If you don’t have the email but still need to deduce the eups tag used for a specific build, then you need to search the build’s stdio log for the specific eups-tag assigned to the build. Look in the stdio log for string: “# BUILD b<number>”; your tag is then “b<number>”.
- For Build #: 340, the eups-tag is: “b182”.
- Note 1: The confusing search string, which might conceptually define either a Buildbot Build or an Eups Build, is an unfortunate output diagnostic word choice.
Setup the DM stack access
The following sets up the LSST-cluster’s DM stack such that it is ready for the developer’s use:
export EUPS_PATH=/lsst/home/lsstsw/stack
source /lsst/home/lsstsw/eups/bin/setups.sh
setup anaconda
setup git
setup lsst
Setup the Specific Build’s Stack
First you need to determine just how successful the stack build was: did it successfully complete all 3 phases: a) build the stack without failure, b) generate the doxygen document for the stack, c) run the end-to-end tester. Once the Build and Unittest phase completes, the stack has been updated for all packages in the release. At this point, even if either of the later two phases fails, the full stack is available for normal, if suspect, use. Buildbot processing terminates at the first fatal exit.
- If the initial (scons and unittest) build phase failed, proceed to section: “Setup a Failed Build’s Environment”.
- If the stack build failed during creation of the doxygen documentation or during the end-to-end testing, then proceed to section: “Setup a Successful Build’s Environment”. However, remember that the buildbot processing terminated early for a reason which was either due to failed doxygen documentation creation or a failed end-to-end test. Those will need to be debugged.
Eups-based commands used during eups-package setup include:
eups list -t  <tag>   # display all packages with the named eups-tag.
setup -t <tag> <package>  # eups-setup <package> and its dependencies.
Setup the Environment based on a Successful SCONS & Unittest Build
If the named build refers to the successful completion of the SCONS build and unittest phase then eups-setup the “lsst_distrib” package for the specific build’s eups-tag. Since the “lsst_distrib” package depends on every package in the DM Release stack, all relevant packages will be setup. You’ll need to determine the eups-tag - see section: “Determine the EUPS-Tag”.
Syntax:
setup -t <tag> <package>
For the current example, use:
setup -t b76 lsst_distrib
Setup the Environment based on a Failed SCONS or Unittest Build
Setting up a failed build’s environment is more complicated. In this case you will use the information provided in the build’s failure email to acquire the failed package’s manifest details. Note the pointers to the failed build’s artifacts listed in the sample failure email below.
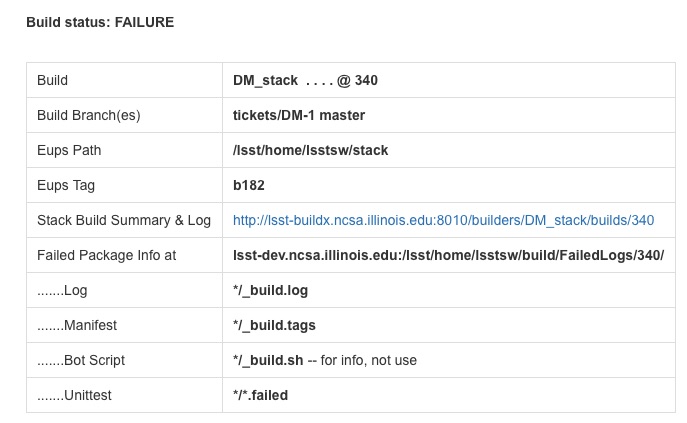
The “Failed Package Info” directory: /lsst/home/lsstsw/build/FailedLogs/340/ , contains a <package> subdirectory for the package which failed.
Since the failure was during the scons or unittest build, the dependent packages of the failed packages need to be setup. Look-up the name of the package which failed - either in the stdio log or an ‘ls’ of the Failed Package Info directory listed in the email:
export FailedPackageDir=/lsst/home/lsstsw/build/FailedLogs/340/
export Manifest=_build.tags
setup -m $FailedPackageDir/<package>/$Manifest
Now you’re ready to git-extract the failed package into your local space, set it up as a LOCAL instantiation. For the current example, you’d:
cd <favorite scratch space>
git clone git@github.com:lsst/afw.git
cd afw
setup -t b182 -r .   # or (see Note below): setup -T b182 -r .
scons -Q opt=3
Note: If your debugging leads you to modify other packages whilst using the same underlying stack, you move into eups management magic. As DM’s eups guru said regarding the details of eups management: With ‘-t’, you override any dependencies; with ‘-T’ you only use the tag if no version is specified. You probably want something more like:
setup -t rhl -T <tag> package
(get the <tag> package, but override with my own ones).
Ready for Debug
You’ve reached this point because either:
- a package failed to build and unittest,
- the doxygen documentation failed to build, or
- the end-to-end test failed to run - either due to deviation from the benchmarked computational output or a compilation error due to changing DM stack APIs.
Finding Concordance between eups-tag and buildbot-number
A table, maintained on the lsst cluster, contains the mapping between assigned eups-tags and the buildbot builds which used them. The table is found in ~lsstsw/build/eupsTag_buildbotNum . Each row of the table contains the following colon (:) separated fields:
- eups-tag - the tag assigned by the CI software to the stack comprising the products being built on a specific buildbot slave.
- buildbot build number - the monotonically-increasing build run id for a specific buildbot slave.
#. status of build - one of (“success”, “failure”); refers to the build status for the suite of products specified for the build. branches used during the build - blank separated list of branches, in eups-VRO order, which were used to select the specific package branch being built.
- A sample table follows::
- b202:432:failure:master b202:433:success:master b202:434:success:master
The first line indicates that buildbot run: 432, failed while build-and-unit testing a package. The eups-tag: b202, was generated as soon as the transient package manifest for the full stack build was generated. As the build progresses, the successfully built&tested packages are added to the permanent manifest for the stack. For a more detailed description of the stack tagging process see the README in DM package: devenv/lsst_build.
The second line indicates that the subsequent buildbot build succeeded when using the same packages and branches as the last build. The archived stack manifest for eups-tag b202 would now list every package used during the build.
The third line demonstrates what happens when a subsequent build occurs which again uses the same packages and branches as the original build. The CI software deduces that no new packages were to be added to what has already been done, so it doesn’t need to process further.
A successful build is one in which all packages for the buildbot run’s product have been built and unit tested successfully. Currently that includes all of sims, qserv and lsst_distrib products and their dependencies.
System Troubleshooting
Glossary
Buildmaster
the Buildbot supervisory process: polls the git-repositories for change; triggers Builders on schedule; on git-change or on another Builder’s request; serves the Buildbot web pages; and emails status reports on Builder completion.
Builder
a process initiated by the Buildbot master to effect a desired processing goal. The Builder may initiate sequential sub-processes on the Buildmaster host and/or on a captive Buildslave host, The most common Builders direct the building of a code stack according to pre-defined sequence of operations, known as build steps.
Buildslave
provides computational resources on a remote host for a Builder process.
build step
is a self-contained sub-process which is invoked either on the Buildmaster or a Buildslave as dictated by the Builder invoking the step.
trigger
an event which alerts the Buildmaster to initiate a pre-determined Builder. Types of triggers are:
- on-change or on-git-change: a trigger event which occurs when the source code repository is changed;
- on-schedule a trigger event which occurs at a defined point in time - hourly, daily, weekly, etc.
- on-builder-request a trigger event which initiates a secondary builder.
DRP
LSST-speak for a stack which can execute a Data Release Production given suitable input data and computing resources.