DM Development Workflow with Git, GitHub, JIRA and Jenkins
This page describes our procedures for collaborating on LSST DM software and documentation with Git, GitHub and JIRA:
In appendices, we suggest some best practices for maximizing the usefulness of our Git development history:
Other related pages:
Git & GitHub Setup
A Science Pipelines installation comes with the required version of Git and the Git LFS client to work with our data repositories. Follow these steps to configure your Git environment for DM work:
Configure Git LFS to allow authenticated access to our LFS repositories.
Set Git and GitHub to use your institution-hosted email address.
Agile development with JIRA
We use JIRA to plan, coordinate and report our work. Your Technical/Control Account Manager (T/CAM) is the best resource for help with JIRA within your local group. T/CAMs can consult DMTN-020. This section provides a high-level orientation for everyday DM development work.
See also: JIRA Work Management Recipes.
Agile concepts
- Issue
Issues are the fundamental units of work/planning information in JIRA.
- Story Points
Story points are how we estimate and account for time and effort. One story point is an idealized half day of uninterrupted work by a competent developer.
- Velocity
No developer works a two story point day. Communication overhead, review work, and other activities will invariably eat into your day. Velocity is the fraction of a story point that you can reasonably achieve in a half day. A common velocity in DM is 0.7, so that you nominally accomplish 1.4 story points in a day. We do not track velocities for individual developers; each DM group shares a common velocity. Ask your T/CAM.
- Epic
Epics are a special type of issue, created by T/CAMs, that guide your work over a six month cycle in pursuit of DM’s development roadmap (LDM-240). At the start of each cycle, your T/CAM will create an epic (or several) and allocate story points to that epic. You don’t work directly on an epic; rather you work on stories (below) that cumulatively accomplish the epic.
Tickets
All development work is done on these three types of JIRA issues that are generically referred to as tickets:
- Story
Stories are for work that accomplish your main goals for a cycle. Stories are part of regular epics, planned at the start of each cycle.
- Bug
A ticket of type bug describes “emergent” work: it was not planned at the start of a development cycle, but rather is a response to an unexpected problem report. Bugs are associated with special epics designated for addressing emergent work.
- Improvement
An improvement is essentially a feature request. Like a bug, an improvement is emergent, and hence belongs in a special epic. Unlike a bug, an improvement adds new functionality.
You might notice that you also have the ability to create issues of type “Epic” and ”Milestone”. You should only create the former in consultation with your T/CAM. The latter are not used in the DM workflow: you should never create them.
Issue semantics were discussed in RFC-43.
As a developer, you can create tickets to work on. You can also create bug or improvement tickets and assign them to others (ideally with some consultation).
Creating a ticket
You can create a ticket from the JIRA web app toolbar using the Create button. For more general information, you can consult Atlassian’s docs for JIRA and JIRA Agile.
JIRA allows a myriad of metadata to be specified when creating a ticket. At a minimum, you should specify:
- Project
For normal work, this should be set to Data Management. It may occasionally be appropriate to use another project; for example, when requesting work from another LSST subsystem or when filing an RFC.
- Issue Type
If the work is associated with an epic, the issue type is a ‘Story.’ For emergent work, ‘Bug’ or ‘Improvement’ can be used (see above for semantics).
- Summary
This is the ticket’s title and should be written to help colleagues browsing JIRA dashboards.
- Description
The description should provide a clear description of the deliverable that can serve as a definition of ‘Done.’ This will prevent scope creep in your implementation and the code review. For stories, you can outline your implementation design in this field. For bug reports, include any information needed to diagnose and reproduce the issue. Feel free to use Atlassian markup syntax.
In addition, you may be able to provide some or all of the following. While, in general, it’s helpful to provide as much information as you can, don’t worry about leaving some fields blank: the T/CAMs will ensure the work gets picked up and assigned to the right place, and empty metadata is better than bad medadata.
- Components
You should choose from the pre-populated list of components to specify what part of the DM system the ticket relates to. More guidance on choosing appropriate components is available, but, if in doubt, ask your T/CAM.
- Assignee
Typically you will assign yourself (or your T/CAM will assign you) to a ticket. You can also assign tickets to others. If you are uncertain about who the assignee should be you can allow the ticket to be automatically assigned.
- Story Points
Use this field, at ticket creation time, to estimate the amount of effort involved to accomplish the work. Keep in mind how velocity (see above) converts story points into real-world days.
- Labels
Think of labels as tags that you can use to sort your personal work. Unlike the Component and Epic fields, you are free to create and use labels in any way you see fit, but you should also refer to this list of common labels.
- Linked Issues
You can express relationships between JIRA issues with this field. For example, work that implements an RFC should link to that RFC. You can also express dependencies to other work using a ‘is Blocked by’ relationship.
- Epic Link
If the ticket is a story, you must specify what epic it belongs to with this field. By definition, bug or improvement-type tickets are not associated with an epic.
- Team
Specify which DM team is responsible for doing the work. Refer to the list of supported teams.
Ticket status
Tickets are created with a status of Todo.
Once a ticket is being actively worked on you can upgrade the ticket’s status to In Progress.
It’s also possible that you may decide not to implement a ticket after all. In that case, change the ticket’s status to Won’t Fix.
If you discover that a ticket duplicates another one, you can retire the duplicate ticket by marking it as Invalid. Name the duplicate ticket in the status change comment field.
DM GitHub Organizations
DM’s Git repositories are available from three GitHub organizations: lsst, lsst-dm, and lsst-sqre. LSST DM source code is publicly available and open source.
You should already be a member of the lsst and lsst-dm GitHub organizations. If you cannot create repositories or push to repositories there, ask your T/CAM to add you to these organizations.
lsst GitHub organization
The lsst GitHub organization is for public-facing code and documentation repositories. Specifically, packages in main EUPS distributions are available from the lsst organization, along with official documents (including LDM design documentation).
lsst-dm GitHub organization
The lsst-dm GitHub organization is for miscellaneous Data Management projects:
EUPS packages that are not yet part of the official distribution. Projects can be incubated in lsst-dm and later migrated to the lsst organization.
Retired projects and EUPS packages (these have names prefixed with “legacy”).
Prototypes, internal experiments, and other types of ad-hoc projects.
Internal documentation, including DMTN technotes and this DM Developer Guide.
lsst-sqre GitHub organization
The lsst-sqre GitHub organization is used by the SQuaRE team for operational services and internal experiments. SQuaRE’s technical notes (SQR) are also available in lsst-sqre.
Upstream repositories and organizations
Whenever possible, DM developers should contribute to the third-party open source codebases used by the LSST Stack. Since this type of development is typically done with a fork-and-PR workflow, the third-party repo should be forked into an LSST organization, usually lsst-dm or lsst-sqre. Doing upstream development in an LSST GitHub organization lets the team more easily identify what work is being done.
Personal GitHub repositories
Use personal repositories for side projects done after hours or on “science time.” Work by DM staff that is delivered to LSST in ticketed work can’t be developed in personal GitHub repositories outside of the lsst, lsst-dm, and lsst-sqre GitHub organizations, though.
Community contributors can of course use personal repositories (and forks of LSST repositories) to make contributions to LSST. When an external user has created a pull request (which should be automatically checked for style using GitHub Actions), a staff member should follow these steps to help the community member merge their contribution:
Review the community member’s pull request, following our code review guidelines.
Create a jira ticket (
DM-98765in this example) for the contribution, and fetch their pull request to this ticket branch:# Assume PR #456 is the community member's PR with newly-created Jira ticket DM-98765 git fetch origin pull/456/head:tickets/DM-98765
Checkout the local branch of the respective repository.
git checkout tickets/DM-98765
Build and test the ticket (locally and with Jenkins CI system) as normal, so that it can be tracked using our existing tooling. As part of this, push to your own ticket branch:
git push -u origin tickets/DM-98765
After pushing the new branch, a new pull request should be created for it, and the original pull request should be closed with a comment linking to the jira ticket and new PR.
DM Git Branching Policy
Rather than forking LSST’s GitHub repositories, DM developers use a shared repository model by cloning repositories in the lsst, lsst-dm, and lsst-sqre GitHub organizations.
Since the GitHub origin remotes are shared, it is essential that DM developers adhere to the following naming conventions for branches.
See RFC-21 for discussion.
The main branch
main is the main integration branch for our repositories.
The main branch should always be stable and deployable.
In some circumstances, a release integration branch may be used by the release manager.
Development is not done directly on the main branch, but instead on ticket branches.
Documentation edits and additions are the only scenarios where working directly on main and by-passing the code review process is permitted.
When the main branch is protected from direct pushes, as in most of our code packages, user branches may be used for documentation edits.
In most cases, documentation writing benefits from peer editing (code review) and can be done on a ticket branch.
The Git history of main must never be re-written with force pushes.
User branches
You can do experimental, proof-of-concept work in ‘user branches.’
These branches are named
u/{{username}}/{{topic}}
User branches can be pushed to GitHub to enable collaboration and communication. Before offering unsolicited code review on your colleagues’ user branches, remember that the work is intended to be an early prototype.
Developers can feel free to rebase and force push work to their personal user branches.
A user branch cannot be merged into main; it must be converted into a ticket branch first. The only exception is for documentation edits and additions; we want to minimize the steps required to update docs, including docstrings, package documentation, or guides (like this one).
Ticket branches
Ticket branches are associated with a JIRA ticket.
Only ticket branches can be merged into main.
(In other words, developing on a ticket branch is the only way to record earned value for code development.)
If the JIRA ticket is named DM-NNNNN, then the ticket branch MUST be named
tickets/DM-NNNNN
A ticket branch can be made by branching off an existing user branch. This is a great way to formalize and shape experimental work into an LSST software contribution.
When code on a ticket branch is ready for review and merging, follow the code review process documentation.
Simulations branches
The LSST Simulations team uses a different branch naming scheme:
feature/SIM-NNN-{{feature-summary}}
Review Preparation
When development on your ticket branch is complete, we use a standard process for reviewing and merging your work. This section describes how to prepare your work for review.
Search for TODO comments
Search for your ticket number (with the ‘DM-’ prefix) in all repositories associated with the LSST organization on GitHub (using “org:lsst” as the prefix). If there are any TODO comments linked with your current ticket, make sure that they are addressed in this ticket and remove the comments. If any additional follow up work is needed to fully resolve the issue, update the comment to reflect the follow up ticket. This is particularly relevant for long-standing tickets.
Pushing code
We recommend that you organize commits, improve commit messages, and ensure that your work is made against the latest commits on main with an interactive rebase.
A common pattern is:
git checkout main
git pull
git checkout tickets/DM-NNNNN
git rebase -i main
# perform the interactive rebase in your editor
git push --force
Testing with Jenkins
Start a stack-os-matrix Jenkins job to run the Stack’s tests with your ticket branch work.
To learn more about DM’s Jenkins continuous integration service, see Jenkins ci.lsst.cloud Overview. Then follow the steps listed in Testing the LSST DM Stack with the Jenkins stack-os-matrix Job to run the tests.
Make a pull request
On GitHub, create a pull request for your ticket branch.
The pull request’s title should be prefixed with the Jira ticket handle, followed by a short summary:
DM-NNNNN: {{Short summary}}
This format helps you and other developers find the right pull request when browsing repositories on GitHub. The short summary should describe the code changes. It can often be the Jira title if that is relevant to the changes.
The pull request’s description shouldn’t be exhaustive; only include information that will help frame the review. Background information should already be in the JIRA ticket description, commit messages, and code documentation.
DM Code Review and Merging Process
The scope and purpose of code review
We review work before it is merged to ensure that code is maintainable and usable by someone other than the author.
Is the code well commented, structured for clarity, and consistent with DM’s code style?
Is there adequate unit test coverage for the code?
Is the documentation augmented or updated to be consistent with the code changes?
Are the Git commits well organized and well annotated to help future developers understand the code development?
Code reviews should also address whether the code fulfills design and performance requirements.
Ideally the code review should not be a design review. Before serious coding effort is committed to a ticket, the developer should either undertake an informal design review while creating the JIRA story, or more formally use the RFC and RFD processes (see Discussion and Decision Making Process (RFC, RFD)) for key design decisions.
Assign a reviewer
On your ticket’s JIRA page, click the Ask for Review button at the top of the page to switch the ticket’s state to In Review. JIRA will open an overlay box to assign reviewers and send them a message about the review.
In your JIRA message requesting review, indicate how involved the review work will be (“quick” or “not quick”). The reviewer should promptly acknowledge the request, indicate whether they can do the review, and give a timeline for when they will be able to accomplish the request. This allows the developer to seek an alternate reviewer if necessary.
Any team member in Data Management can review code; it is perfectly fine to draw reviewers from any segment of DM. For major changes, it is good to choose someone more experienced than yourself. For minor changes, it may be good to choose someone less experienced than yourself. For large changes, more than one reviewer may be assigned, possibly split by area of the code. In this case, establish in the review request what each reviewer is responsible for.
Do not assign multiple reviewers as a way of finding someone to review your work more quickly. It is better to communicate directly with potential reviewers directly to ascertain their availability.
Code reviews performed by peers are useful for a number of reasons:
Peers are a good proxy for maintainability.
It’s useful for everyone to be familiar with other parts of the system.
Good practices can be spread; bad practices can be deprecated.
All developers are expected to make time to perform reviews. The System Architect can intervene, however, if a developer is overburdened with review responsibility.
Code review discussion
Using GitHub pull requests
Code review discussion should happen on the GitHub pull request, with the reviewer giving a discussion summary and conclusive thumbs-up on the JIRA ticket.
When conducting an extensive code review in a PR, reviewers should use GitHub’s “Start a review” feature . This mode lets the reviewer queue multiple comments that are only sent once the review is submitted. Note that GitHub allows a reviewer to classify a code review: “Comment,” “Approve,” or “Request changes.” While useful, this feature doesn’t replace JIRA for formally marking a ticket as being reviewed.
Reviewers should use GitHub’s line comments to discuss specific pieces of code. As line comments are addressed, the developer may use GitHub’s emoji reactions to indicate that the work is done (the “👍” works well). Responding to each line comment isn’t required, but it can help a developer track progress in addressing comments. We discourage replies that merely say “Done” since text replies generate email traffic; emoji reactions aren’t emailed. Of course, use text replies if a discussion is required.
GitHub PR reactions are recommended for checking off completion of individual comments.
Another effective way to track progress towards addressing general review comments is with Markdown task lists.
Resolving a review
Code reviews are a collaborative check-and-improve process.
Reviewers do not hold absolute authority, nor can developers ignore the reviewer’s suggestions.
The aim is to discuss, iterate, and improve the pull request until the work is ready to be deployed on main.
Changes in response to a review should be made by squashing changes onto the main commit implementing that feature, where practical. This avoids cluttering the final Git commit history with iterative improvements from code review. If this is not practical, changes may be made by new commits, which must be as well-organized and well-documented as the original work (see Appendix: Commit Organization Best Practices). In no event should you simply commit all changes as “Response to review”.
If the review becomes stuck on a design decision, that aspect of the review can be elevated into an RFC to seek team-wide consensus.
If an issue is outside the ticket’s scope, the reviewer should file a new ticket.
Once the iterative review process is complete, the reviewer should switch the JIRA ticket’s state to Reviewed.
Note that in many cases the reviewer will mark a ticket as Reviewed before seeing the requested changes implemented. This convention is used when the review comments are non-controversial; the developer can simply implement the necessary changes and self-merge. The reviewer does not need to be consulted for final approval in this case.
Resolving with multiple reviewers
If there are multiple reviewers, our convention is that each review removes their name from the Reviewers list to indicate sign-off; the final reviewer switches the status to Reviewed. This indicates the ticket is ready to be merged.
Merging
Putting a ticket in a Reviewed state gives the developer the go-ahead to merge the ticket branch. If it has not been done already, the developer should rebase the ticket branch against the latest main. If a rebase was required, a final check with Jenkins should be done.
GitHub pull request pages offer a ‘big green button’ for merging a branch to main. We encourage you to use this button when GitHub says “This branch has no conflicts with the base branch”, “All checks have passed”, and at least one of the checks has “Required” next to it, which should be the case for almost all repos that are being changed. For normally-configured repos, using the button will also delete the ticket branch after the merge. Do not select a different merge strategy from the pulldown next to the button; these should be disabled anyway.
Also do not click the “Update branch” button as that does a merge from main;
rebase from the command line instead or use the “Update with rebase” option by clicking on the little down arrow on the right side of the button.
Many repositories in the lsst` and lsst-dm Github organizations have an automated check that will fail and prevent merging into main if “Update with merge commit” is used.
If you mistakenly clicked the “Update branch” button, you can rectify it by following the rebasing procedure described above.
The figure below shows what the git history looks like for a typical Science Pipelines package.
Note that each merge to main is independent from any other, and history is linear.
This history makes git bisect searches more obvious.
We understand that this workflow may take longer to get used to, but the end result of a clean history has paid us dividends in finding when particular algorithmic changes had unexpected effects.
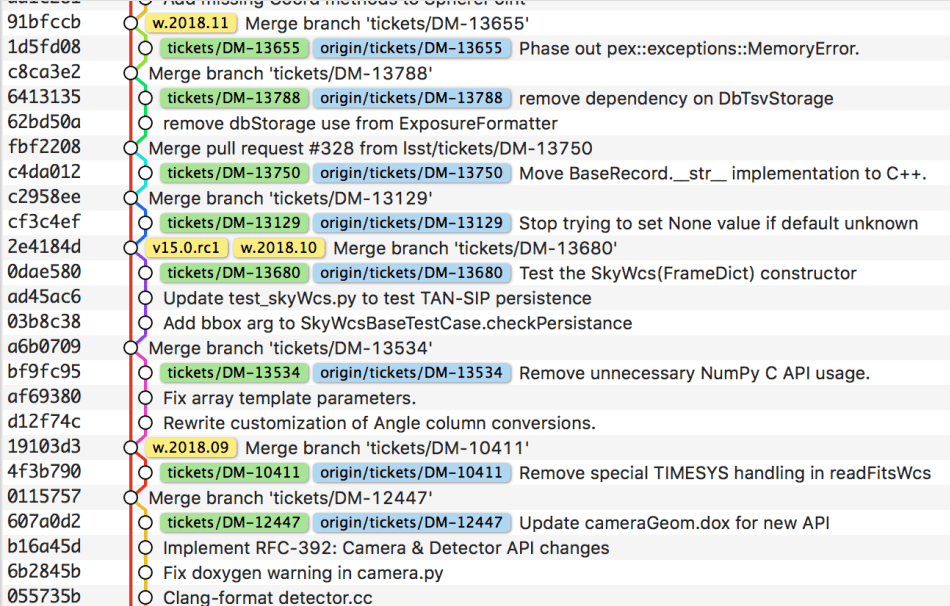
What our git history looks like, following the rebase workflow.
We always use non-fast forward merges so that the merge point is marked in Git history, with the merge commit containing the ticket number:
git checkout main
git pull  # Sanity check; rebase ticket if main was updated.
git merge --no-ff tickets/DM-NNNNN
git push
The ticket branch may be deleted from the GitHub remote if its name is in the merge commit comment (which it is by default).
Fixing a breakage on main
In rare cases, despite the pre-merge integration testing process described above, a merge to main might accidentally contain an error and “break the build”. If this occurs, the merge may be reverted by anyone who notices the breakage and verifies that the merge is the cause – unless a fix can be created, tested, reviewed, and merged very promptly.
Such a fix need not use a brand new ticket and ticket branch.
Instead, it can be performed on a “hotfix” branch named after the original ticket that was merged, typically tickets/DM-NNNNN-hotfix.
If a merge revert is required, the following process should be followed:
Create a new “revert” branch named
tickets/DM-NNNNN-revert. This is necessary because no pushes are allowed directly to themainbranch.Revert the faulty merge commit on the branch:
git revert -m 1 {merge hash}.-m 1indicates that the first parent is the “mainline” code that should be kept.Push the branch, create a PR, and merge it as normal.
The commits on the reverted branch cannot be re-merged from that branch as is, even if fixes have been applied.
The branch should instead be rebased on main after the revert, according to our normal process.
Announce the change
Once the merge has been completed, the developer should mark the JIRA ticket as Done. If this ticket adds a significant feature or fixes a significant bug, it should be announced in the DM Notifications category of community.lsst.org with tag dm-dev. In addition, if this update affects users, a short description of its effects from the user point of view should be prepared for the release notes that accompany each major release. (Release notes are currently collected via team-specific procedures.)
Appendix: Commit Organization Best Practices
Commits should represent discrete logical changes to the code
OpenStack has an excellent discussion of commit best practices; this is recommended reading for all DM developers. This section summarizes those recommendations.
Commits on a ticket branch should be organized into discrete, self-contained units of change. In general, we encourage you to err on the side of more granular commits; squashing a pull request into a single commit is an anti-pattern. A good rule-of-thumb is that if your commit summary message needs to contain the word ‘and,’ there are too many things happening in that commit.
Associating commits to a single logical change makes debugging and code audits easier:
Git bisect is more effective for zeroing in on the change that introduced a regression.
Git blame is more helpful for explaining why a change was made.
Better commit organization guides reviewers through your pull request, making for more effective code reviews.
A bad commit can more easily be reverted later with fewer side-effects.
Some edits serve only to fix white space or code style issues in existing code. Those whitespace and style fixes should be made in separate commits from new development. Usually it makes sense to fix whitespace and style issues in code before embarking on new development (or rebase those fixes to the beginning of your ticket branch).
Rebase commits from code reviews rather than having ‘review feedback’ commits
Code review will result in additional commits that address code style, documentation and implementation issues.
Where possible, authors should rebase (i.e., git rebase -i main) their ticket branch to squash the post-review fixes to the pre-review commits.
The preference is that a pull request, when merged, should have a coherent development story and look as if the code was written correctly the first time.
If such a rebase is too difficult (e.g., because it would result in excessive merge conflicts), then post-review commits may be left appended to the pre-review commits. Any commits not squashed in this way should represent discrete logical changes and have informative commit messages, as if the changes had been made before review.
Appendix: Commit Message Best Practices
Generally you should write your commit messages in an editor, not at the prompt.
Reserve the git commit -m "messsage" pattern for ‘work in progress’ commits that will be rebased before code review.
We follow standard conventions for Git commit messages, which consist of a short summary line followed by body of discussion. Tim Pope wrote about commit message formatting.
Writing commit summary lines
Messages start with a single-line summary of 50 characters or less. Consider 50 characters as a hard limit; your summary will be truncated in the GitHub UI otherwise. Write the message in the imperative tense, not the past tense. For example, “Add feature …” and “Fix issue …” rather than “Added feature…” and “Fixed feature….” Ensure the summary line contains the right keywords so that someone examining a commit listing can understand what parts of the codebase are being changed. For example, it is useful to prefix the commit summary with the area of code being addressed.
Writing commit message body content
The message body should be wrapped at 72 character line lengths, and contain lists or paragraphs that explain the code changes. The commit message body describes:
What the original issue was; the reader shouldn’t have to look at JIRA to understand what prompted the code change.
What the changes actually are and why they were made.
What the limitations of the code are. This is especially useful for future debugging.
Git commit messages are not used to document the code and tell the reader how to use it. Documentation belongs in code comments, docstrings and documentation files.
If the commit is trivial, a multi-line commit message may not be necessary. Conversely, a long message might suggest that the commit should be split. The code reviewer is responsible for giving feedback on the adequacy of commit messages.
The OpenStack docs have excellent thoughts on writing great commit messages.